updated 2020-02
Piston Rings
Pinned or Not Pinned: Most moped piston rings are two-stroke style, where there are pins in the ring grooves of the piston that keep the rings from rotating around. Two stroke cylinders have holes or ports that the ring ends can snag on. So two stroke rings are pinned to the piston. Four stroke cylinders do not have any holes, so four stroke rings are not pinned. Knowing about those pins is important when installing.
Getting the right rings: If your model is not in the applications, then you must measure the bore and the ring thickness. A calipers is the best tool to measure the bore (ring diameter) and ring thickness. Sometimes your rings might not be original, for many reasons. The piston might be aftermarket with thinner rings. The cylinder might be bored out to an oversize bore. Some mopeds came with more than one piston size or ring style.
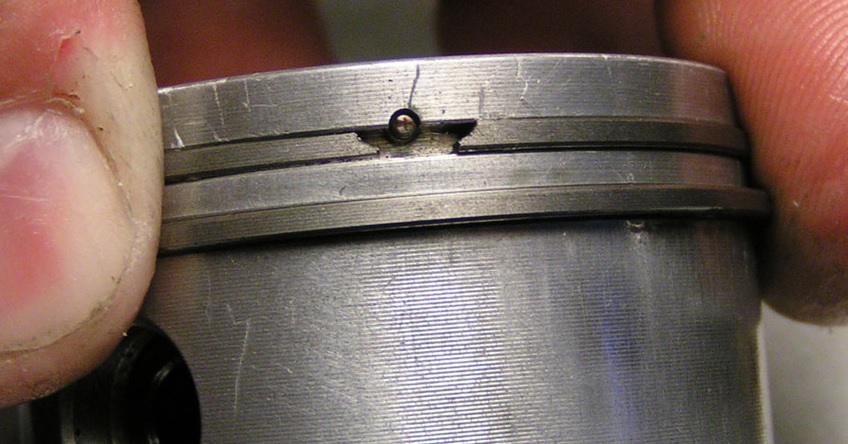
Break a ring, how not to: Two stroke pistons have little pins (stumps, bumps) in the piston ring grooves that prevent the rings from rotating. Knowing where each ring locating pin is, and aligning the ring gap over the pin during cylinder installation, is the key to not breaking the ring.
If the piston is used the ring grooves will need to be cleaned (scraped). Use a piece of old broken ring as a scraper. Make sure the installed ring can rotate freely completely around and close fully in the ring groove.
Then make sure the bare piston will enter the cylinder. Then place each ring in the cylinder to make sure the gap is right, a tiny slit. Once both the piston and rings separately fit the cylinder, then proceed to install everything at once.
Use both thumbnails to spread the ring just enough. Place the ring gap over the ring gap pin. As the piston enters the bottom of the cylinder the slanted cut and the bottom of the cylinder begins to close the top ring. Look at the gap to make sure it is over the locating pin. Wiggle the piston slightly and push gently until the tom ring enters the cylinder and closes fully. Then repeat with the bottom ring.
Replacing Rings
Measuring wear: A new piston ring is a the best tool to measure how worn a cylinder is. Conversely, a new cylinder is the best tool to measure how worn a ring is. To measure the wear of a ring, you need a perfectly round cylinder of a precisely known bore. A worn cylinder that has not been honed will still have it’s original new bore at the very top, above where the rings rub at. A new ring in a new cylinder should have a very small end gap of .004 to .008″. A worn but still OK cylinder with a new ring will have a gap of .0010 to .018″. A worn cylinder and ring both will have an end gap of over .020″(.5mm). A badly worn cylinder and/or ring will have a huge gap, over .030″(.75mm). You measure ring gap with a feeler gauge.
Classifying Piston Rings
Classifying rings: Rings get mixed up and are difficult to tell the size, unless a perfectly round cylinder of an appropriate size is available to place the ring in. If you try to squeeze a piston ring into a circle with just fingers, it inevitably becomes a very rounded polygon, or at best an ellipse. So the measurement becomes inaccurate. At right is how Myrons Mopeds’s Jawa piston rings were classified, using a piece of aluminum tubing with a tight fitting piston inside it to hold the tube round, and the test ring square. From top to bottom, 39.03 x 2.0, 39.28 x 2.0, 39.53 x 2.0, 39.78 x 2.0mm. Each ring increases in diameter by 0.25mm, so the circumference increases by Pi times that, or about 0.8mm. Here the inside of an old fishing pole tube is 39.78mm, perfect for the 3rd oversize 39.78 ring, on the bottom, with a gap of almost zero. Each gap is 0.8mm more because each ring is 0.25mm less diameter. It is important that the piston and ring fit the cylinder properly.
Filing down: To make a ring slightly smaller, one of the two ring ends can be filed down, while preserving the shape. To reduce the size (diameter) by 0.20 mm, the end must be filed down by pi times that, 0.63 mm. When a filed down ring is installed in a cylinder smaller than it was designed for, two things change. The tension is greater, and the shape is slightly non-circular. So filed rings need a longer break-in period, to wear down the higher places. With 38 to 41 mm rings, the size can be reduced by 0.2mm with about 30 minutes of break-in, and by 0.5mm with about 2 hours of break-in. After break-in the rings have a mirror polish all around.
Why is the width not specified? Because the inner side of the ring does not touch anything. The ring has spring tension pushing it outwards, keeping the bottom (inner) surface from touching the bottom of the ring groove. So the ring width can be any amount, from about half the groove depth, to the groove depth. The exact ring width is not important. Exact ring height and diameter are important.
Pistons
Two-stroke Piston Installation: Unlike a four-stroke engine, a two-stroke has holes in the cylinder wall, called ports. The ends of the rings are prevented from passing over any of the ports, by pins in the piston, inside or alongside the ring groove. A four-stroke piston does not have ring pins. Two-stroke ring pins often get overlooked, resulting in broken or damaged rings. See above about ring installation.
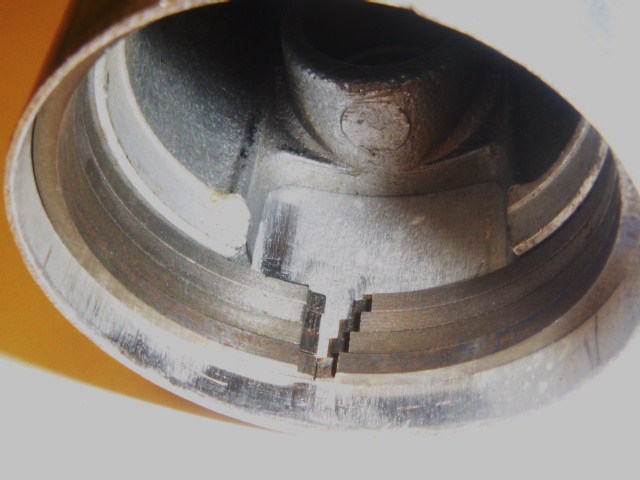
Pistons can be installed backward. Some do not matter which side faces forward or backward. But most do have a intake side (usually rear or up facing) and an exhaust side (usually forward or down facing). If it matters which way there will be a mark on the top of the piston, usually an arrow, on the exhaust side. Some Italian pistons say “SC” on the exhaust (scoria) side instead of an arrow.
There is a way to tell which way a piston faces regardless of the markings. This method is for when arrow on top is missing, or gets coated with black carbon, or if the piston is a substitute made for a different engine or cylinder. Remove the cylinder and piston and rings. Mark the top of the piston where the ring pins are. Place the piston in the cylinder at the bottom of the stroke, where the piston top is even with the exhaust port bottom. The angle of the piston pin needs to be the same as if it was on the crank. Now look straight up the cylinder wall from the ring pin marks for any ports. The ring gaps should never be closer that about 3mm 1/8″ from any port. If they they are then rotate the piston 180 degrees and see if that way works. If any ring end is allowed to pass over a hole, the engine will run for awhile, maybe 5 minutes to an hour. Then the ends of the ring will become rounded and the engine will loose compression.
Piston to cylinder clearance: It’s important that the piston fits the cylinder properly. An old messed up piston that fits correctly is better than a new piston that fits too loose or too tight. Too loose will be hard to start and weak. Too tight will seize up when hot. Often a cylinder needs to be bored out slightly to fit an oversize piston. Some aluminum cylinders have plated walls that cannot be bored out. The piston diameter, measured at the skirt, is a hair smaller than the cylinder bore.
The following piston/cylinder clearance limits are from the Puch factory service manual:
Puch “Lo-torque” nikasil plated aluminum (7-fin) cylinders: Min .0008“(.020mm) Max .0016“(.040mm)
Puch “Hi-torque” steel sleeved aluminum (8-fin) cylinders: Min .001″ (.029mm) Max .002“(.055mm)
Puch “Magnum” steel sleeved aluminum (9-fin) cylinders: Min .001″ (.029mm) Max .002“(.055mm)
As the engine gets hot, the piston to cylinder clearance approaches zero. Besides “diam“, “upper“, “pin“, and “lower“, other things matter in piston compatibility. The ring pins must locate the ring gaps so they never pass over a port. The exhaust-side skirt must be long enough to cover the exhaust port at tdc. The intake-side skirt, on a piston port two stroke, controls the intake timing. Shorter skirt opens sooner and closes later. A longer intake skirt is one way some mopeds are restricted in power. Simply grind the excessively long piston skirt back to 30mph specification, but no farther, to de-restrict the piston. Puch, Tomos, Garelli are the main kinds that use longer pistons to lower the speed, for 25 and 20mph states or jurisdictions. This list contains all pistons made by original equipment manufacturers, although most of them are no longer available. The not-available ones are listed for their information, such as speed versions or piston size choices. If you happen to have an unknown piston with or without a part number, you can identify what it is from this list by measuring it and looking for matching measurements. From all these specifications, perhaps a compatible piston can be found or adapted.
Cylinders
Honing: There are two kinds of hones, solid and flexible, with different purposes.
1) A solid type adjustable flat-stone hone will shave off high spots and restore roundness. It is used first for when there is damage like melted aluminum stuck to the cylinder wall, or gouges, or just regular wear at mostly the top exhaust side. After a dozen rotations or so any high spots are revealed, because the stone does not touch the low spots or worn areas. This type of hone is useful for both diagnosing and restoring.
2) A flexible flat-stone or ball-stone will skip over high spots and not restore roundness. It is used last for lightly scratching the cylinder wall surface, and for rounding any sharp edges on the ports. Simple “finger sanding” with emery cloth is almost the same as flexible-ball honing.
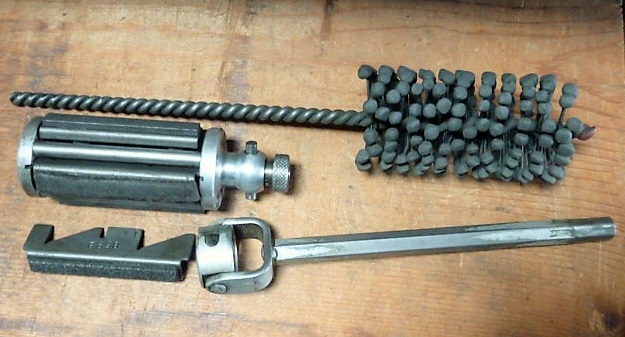
Top is a flexible hone, ball type, 2″ (when new).
Bottom is a solid hone, adjustable, 1½-2″.
One of the flat stones is shown removed.

A worn Benelli G2 cylinder after solid-type honing.
Light areas are shaved. Dark (worn) areas are untouched.
Max wear zone is near the top where the pressure is most.
The very top does not wear because the rings don’t rub there.
Cylinder checking and honing:
1) Before honing, the used top ring is placed at the very top of the cylinder, where no wear occurs. The ring gap is noted, either visually or measured with a feeler gauge. If the cylinder has never been honed before, the ring gap at very top will indicate how much ring wear there is.
2) If a new ring is available, place it at the top and notice the ring gap. If the cylinder has never been honed it will have a very small gap, 0.004 – 0.008 inch (0.1 to 0.2 mm). That is only a little more than one human hair! Now place the ring in the maximum wear zone at the top of the ring travel. Compare the ring gap there. That tells how much wear the cylinder has since it was either new or last honed.
3) With just the ring installed squarely in the max wear zone, hold the cylinder towards a white wall or brightly lit background. Visually see if any light can get under the ring. This checks both the ring and cylinder for roundness. If the ring is new and is the correct size, this checks the cylinder for roundness.
4) The cylinder is honed briefly with a solid-type adjustable hone (not flexible). This shaves off high spots and exposes worn areas.
5) It is visually inspected for any deep grooves remaining, especially higher than the top of the exhaust port. If grooves and low areas remain, honing is repeated until most of the high areas are shaved off and only some low areas or shallow grooves remain.
6) Solid-honing restores the condition of the cylinder wall, which is a good thing. But it also makes the cylinder bigger, which is a bad thing. The least amount of honing is best. So leave some patches of un-honed cylinder wall, like in the Benelli cylinder example shown above. When the engine first runs with new rings, the final polishing will occur.
7) After solid-type honing, use a flexible ball type hone to lightly scratch the entire surface, and to round off sharp edges of the ports. The hone is pulled and pushed in and out while rotating, to make a cross hatch pattern. The diagonal scratches help oil to get under the entire ring during break-in. This helps the new rings and cylinder wall to become polished like a mirror after the first few dozen miles of running.
Piston pin hole checking and Piston pin bushing reaming
On most 1960’s and 70’s small two-stroke engines, the piston swings on a bushing. Only some had needle bearings. By the 1990’s all small engines had needle bearings. A needle bearing can endure running without oil, but a bushing cannot. Upgrading to a needle bearing is a good thing, but it is often not possible with the same crank rod. Usually the rod hole needs to be bigger. With Puch, the 12 x 14 bushing has no needle bearing equivalent. The nearest needle bearing size is 12 x 15 (with 1.5 mm rollers). A 12 x 14 bearing would need 1.0 mm rollers, too thin and long to resist bending or breaking. So in most cases it is necessary to re-use or replace the bushing. Below is the procedure for checking, replacing, and reaming the piston pin bushing.

