Contents: 1. Peugeot Carb Service 2. Motobecane Carb Service
1. Peugeot Carburetor Service
Welcome. Here is service information for 1976-1980 Peugeot 102 and 103 moped carburetors (US models).
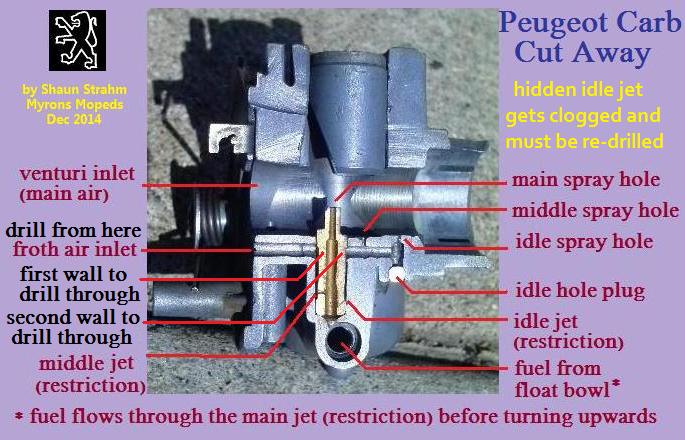
These carburetors are French made, by Gurtner, size 12mm, 10mm, or 8.5mm for different speed versions. They can be quick-serviced without carb removal. The main jet is the brass hexagonal slot head facing the right side, at the bottom. It is also a drain plug for quick flushing. If you are out riding and your main jet gets clogged, causing the engine to not run, you can easily remove the jet with just a key, coin or screwdriver, blow it out with your lips, put it back, restart and continue your ride. That is one of Peugeot’s best features.
How it Works
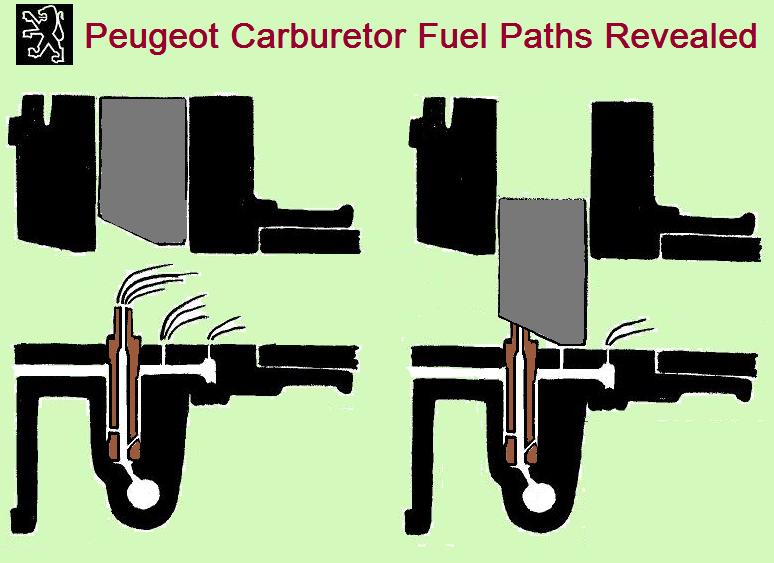
There are three spray holes. When the engine is idling, the throttle slide is down, and the first two spray holes are shielded from the moving air. When the throttle is opened, the slide is up and out of the way. All three spray holes are active. The first (main) spray hole flows about 3 times as much as the second (middle) spray hole, which in turn flows about 3 times as much as the third (idle) spray hole. So the idle uses about one ninth as much gas, roughly. When it gets clogged the net flow at full throttle is about 8/9 or of normal. So it will still run OK with a clogged idle jet.
An automatic float lets in fuel to the reservoir when needed.
Removing the Carburetor
1. Turn the gas valve (petcock) off. With one finger pressing down hard on the float top, so it does not lift up, twist and pull on the fuel hose to disconnect it from the carburetor. If the top is not held down, pulling on the fuel hose can bend the float needle when the lid lifts. Many Peugeot floats have been damaged in this way.
2. Leave both (choke and throttle) cable pinch bolts alone. Disconnect the choke cable, remove the phillips screw on top, and lift out the throttle slide. Notice the round throttle slide has a little prong on top that slides into a slot in the carburetor. You will need to remember that during re-assembly.
3. Loosen the mount clamp nut (10mm hex), then rotate the carburetor assembly gently back and forth, with both hands holding the carburetor, not the air filter box, while pulling rearward. Then wiggle it free.
Servicing the Carburetor
 The normal service consists of cleaning out all tar, rust, and corrosion. After disassembly, carb cleaner spray or parts dip is used to clean off tar and varnish. Anything plastic or rubber is not allowed to come in contact with the carb solvent. Scraping with small screwdrivers, knives, and wire brushes and/or wire wheels are usually needed on the float chamber walls and floor. A small drill bit is twisted, by fingers, in the guide hole at the bottom center of the float bowl, to lift out the fine rust powder that builds up there. Compressed air and carb spray are used to clean out and check all passageways. Seeing the spray enter and exit a passageway tells if it is open, even if you cannot visually see through it, like when there is a “bend in the tunnel”.
Testing with Carb Spray
Carefully (wear goggles) shoot carb spray into the froth air inlet in front below the venturi. There should be “three geysers” or jets of spray shooting out of 1) the main spray hole, 2) the large middle spray hole in the floor, and 3) the small idle spray hole in the floor.
Most of the time, on a bike that has been sitting for years, the idle jet (restriction) is blocked, causing the engine to not idle. When that happens, only the first two spray holes active in the carb spray test, instead of all three. The result is the engine will start and run fine, but won’t idle for over 2 or 3 seconds. Using the choke will compensate a little. Soaking the carburetor does not usually clean out the idle restriction hole, and neither does carb spray. The brass diffuser is pressed tightly into a single-ended hole. The only remedy is to drill a new one.
Drilling a New Idle Hole
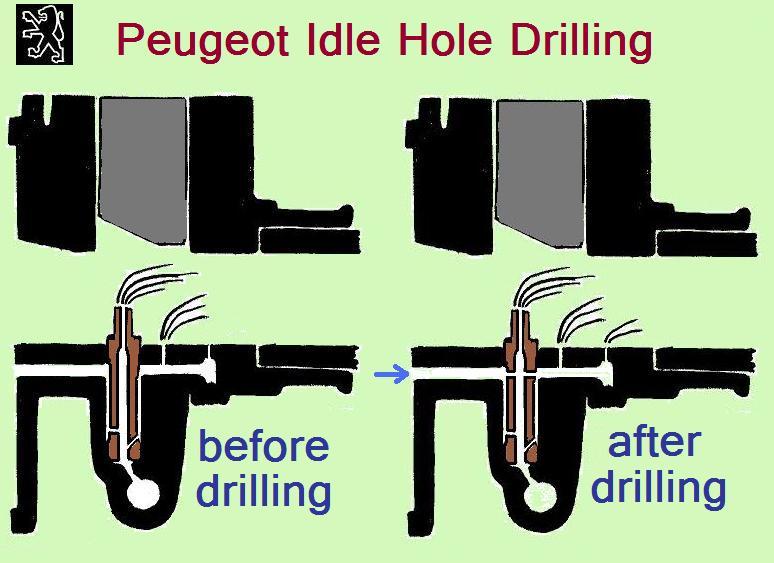 This is for when the carb spray test shows only the first two spray holes active. The careful and delicate drilling procedure uses a #71 drill bit, chucked in a pin vise, chucked in a hand held drill. The #71 is the thinnest drill that is long enough to reach horizontally from the front face back to the third vertical hole. A #72 is a little thinner and shorter, but still works if it is not inserted too deep in the pin vise chuck. A #70 drill is a little bigger and longer, but still works. Already the idle mixture, and mid-throttle mixture, are being made richer by drilling with a #71. On an old moped that is a good thing, because various small air leaks are compensated for. With a too rich idle mixture, the engine will stumble after waiting for a long red light, when the throttle is first opened. So a bigger drill size makes that bad behavior.
Use a half drop of oil and a sharp drill. Dull drill bits can get hot, melt in place, or veer off to one side, and then break off in the hole. Then there is no fixing that. You are drilling, blindly, into a round thing, so the drill wants to go to either side. Try to keep the drill centered and parallel to the horizontal tunnel front to rear. It takes about 5-10 seconds to drill through each wall. After the drilling through the first wall of the diffuser, the bit breaks into the open vertical tunnel, and then encounters the second brass wall. Once through that, the horizontal tunnel is open for the rest of the way. Check the idle circuit before and after drilling, to verify that the idle spray hole did in fact get cleaned and is now working. Other things (air leaks) can cause the engine to not idle, like worn out piston rings and cylinder walls, and leaking crank seals or a stuck-open reed valve.
Restoring the Float
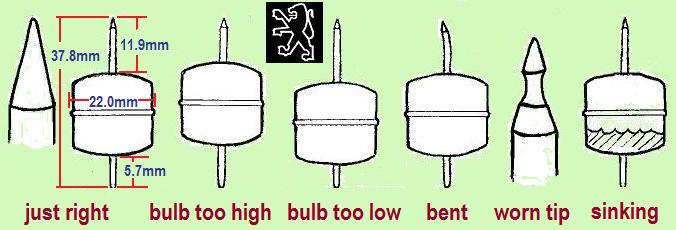
The float is a hollow plastic bulb type, with a 1.5mm thick brass rod pressed through it. The top end of the rod or needle has a precise cone shaped tip. The float needle tip gets worn, or the shaft gets bent. Then the float overflows and fuel drips out of the bottom of the air filter box.
Most of the time, the float will need regrinding of the tip, and maybe also some straightening of the needle shaft. Check to see if the needle is close to 37.8mm in length, the lower part sticks out 5.7mm, and the upper part is 11.9mm. If the bulb needs moving, hold one end of the float needle against the side of a table, while pushing on opposite sides of the bulb with both thumbs. If the needle moves too easy, it might leak fuel into the bulb, so then seal the ends with fuel proof sealant or epoxy, like below.
Shake it to see if it has any fuel inside the bulb. That would make it sink. Evacuate the fuel with compressed air and seal the needle holes with fuel proof sealant (like Kreem tank sealer or epoxy), without adding too much weight.
Chuck the bottom blunt end of the float needle into a hand drill. Spin it to check for trueness. If it is perfectly straight, it will almost appear to be not spinning. If it is bent, then straighten it with a small needle nose pliers. Take small bends and study the result to learn where the pliers need to be for the next bend.
Once the needle is straight, the tip can be sharpened. Machine or sharpen the perfect cone tip, by chucking the needle rod in a small drill and spinning it, at a constant angle and pressure but moving around, against a flat sheet of fine sandpaper, taped to the edge of a table. Follow that with super fine and then polish. Try to keep the needle as long as possible, by only removing what is necessary, and no more.
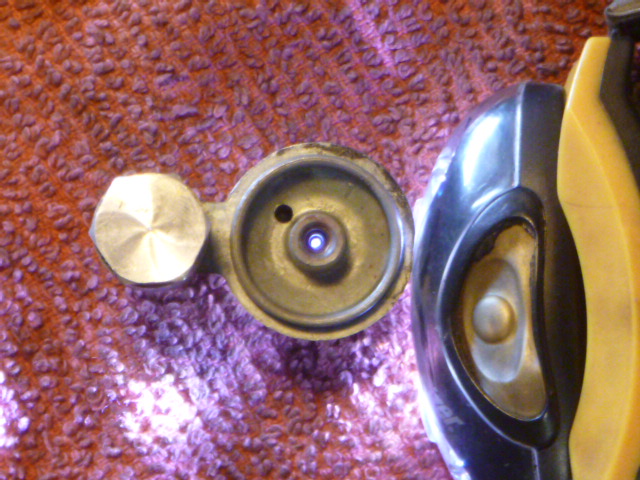 Finally polish the float valve seat in the float top. Use a spinning toothpick, in a drill, with metal polish (or car wax). Inspect the hole with a magnifier. Illuminate it from the side hole as shown on the right. See if there are any scratches in the tiny hole down in the bottom of the small hole.
Bryan of Myrons discovered in 2007 an extremely useful way to sometimes fix a leaking Peugeot float, in a matter of seconds, without removing the carburetor. Close the petcock and remove the jet from the bottom of the carburetor. Blast compressed air into the jet hole. This spins the float rapidly inside the float chamber. Like lapping engine valves, the circular rubbing tends to make the two things (needle and seat) more circular, and less likely to leak.
2. Motobecane Carburetor Service
Welcome. This is from the big blue Motobecane Dealer Manual, section “Repair Operations Models 40, 50, 7”, pages 32-35. The original words are dark grey, and Myrons Mopeds added words are purple.
Don’t replace, restore!
Most importantly, the cleaning procedures in original manuals are for new machines. They say to use compressed air to blow out tiny holes, which does clean the holes perfectly on a new carburetor. But compressed air alone is not enough to clean most older carburetors. Carburetor spray solvent, scraping, brushing, and poking the holes with certain size wires or tiny drills, are normally needed cleaning techniques. That is because years of decomposed gasoline and oil, called varnish, or tar, have coated the inside of the carburetor and gas tank. In addition, moisture can corrode the metal, coating the zinc alloy white and the brass brown or green. Zinc or aluminum corrosion is best cleaned with scraping and vinegar. Brass things like float needles and seats can be lightly machined and then polished.
Removing the Carburetor:
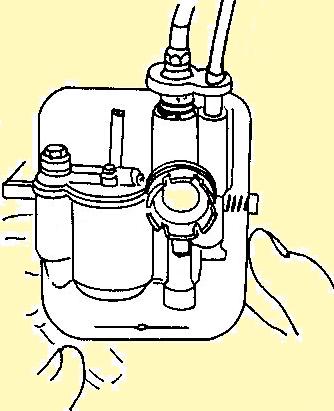
Fig 1 Carb Removal
1. Remove the side covers.
2. Close the fuel tap and disconnect the fuel hose from the carburetor.
3. Remove the air box from the carburetor.
4. Loosen the carburetor clamp bolt. (8mm hex)
5. Remove the carburetor from the inlet pipe.
6. (Top pull choke cable type) Loosen the top cover screw. Remove the cables, slides and top assembly.
7. (Top pull choke cable type) Remove the carburetor (fig. 1).
6. (Bottom pull choke cable type) Leave the cables alone. Continue the service with the carburetor next to the bike.
7. (Bottom pull choke cable type) OR loosen the choke cable pinch bolt on the left handlebar control lever. Loosen the top cover screw. Remove the cables slides and top asssembly. Remove the carburetor (fig. 1).
Installing the Carburetor
1. (Center mount carburetor type) Make sure the plastic bushing on the inlet pipe is in good condition, if so equipped.
2. Make sure the nuts securing the intake pipe to the cylinder are tightened to the correct torque (7 ft lbs) using a torque wrench and 10mm socket. If the intake pipe was removed make sure the mating surfaces are clean. Fit a new gasket.
3. Insert the throttle slide (note the position of the guiding pin) and the choke slide.
4. Fit the top cover and tighten the screw securing it.
5. Make certain that the throttle slide operates freely and fully opens when the throttle grip is fully opened. If necessary, screw the adjustment screw on the handlebar throttle control. It needs to be tight enough to lift the throttle slide in the carburetor fully, yet still have a little bit of slack (so the bike does not accelerate when the steering is turned to the side!)
6. Fit the carburetor to the intake pipe and push fully home. (rotating gently back and forth)
7. Position the carburetor body vertically.
8. Tighten mount clamp (8mm hex)
9. Connect the fuel hose
10. Final idle adjustment can be made with the engine running by screwing or unscrewing the idle adjustment screw on the left of the carburetor.
11. Fit the side covers.
Disassembling the Carburetor: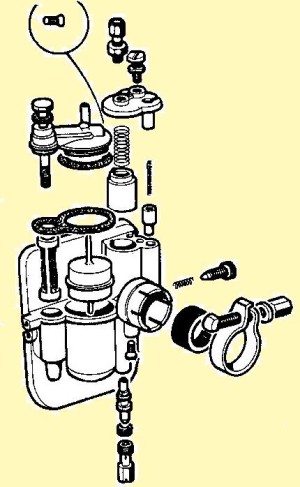

Fig 1 and 2 Float top cover
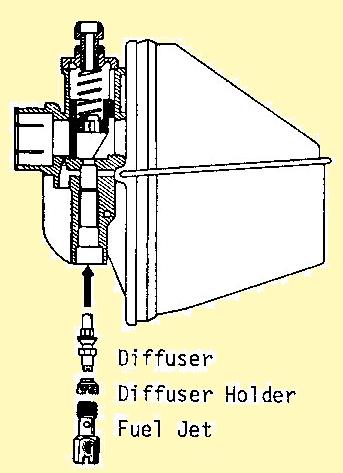
Fig 3 Diffuser and idle tunnel
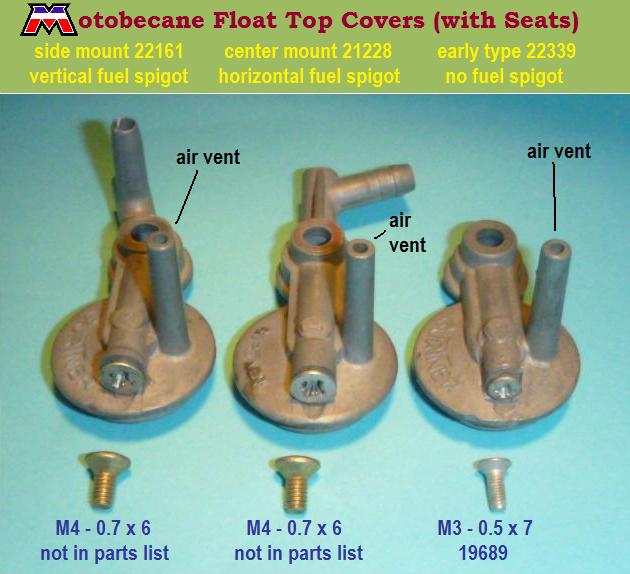
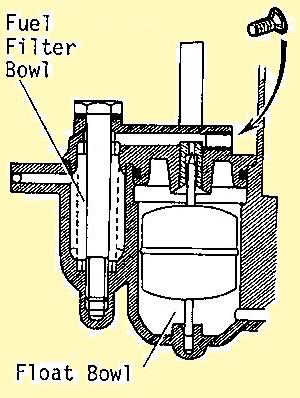
Fig 4 Float top cleaning screw and fuel filter
1. Remove the float bowl cover using a 10mm wrench.
2. Check the paper gasket and o-ring.
3. Loosen the small “cleaning” screw (using a small phillips head screwdriver) or the plastic cap (fig 1 and 2).
4. Clear this pipe if necessary with an air stream.
5. Fit the screw or plastic cap. Apparently the US DOT did not allow the plastic caps, because none were ever on US models. Instead they had a larger cleaning screw, M4 instead of M3. That M4 screw is not listed in the MB USA parts catalogs. Neither is the plastic cap.
6. Check the float for good condition. Plastic (not brass) float bulbs slide up and down on the needle rod with considerable pressure (like with both thumbs pushing the bulb, with the needle pressed against a solid wall). If the bulb is too high, the float will overflow, causing a rich mixture and/or fuel leakage. If the bulb is too low, the engine will “starve” for fuel, at times of high demand. Check if the needle is nearly 41.4mm long, and position the bottom of the bulb to 7.0mm.
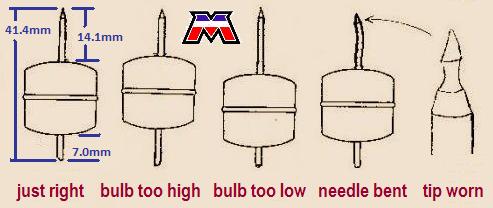
Straighten a bent needle with a small needle-nose pliers. Take small steps, study the result, and adjust the grip point, in order to not make a “dog leg”.
Machine or sharpen the perfect cone tip, by chucking the needle rod in a small drill and spinning it, at a constant angle and pressure but moving around, against a flat sheet of fine sandpaper, taped to the edge of a table. Follow that with super fine and then polish. Try to keep the needle as long as possible, by only removing what is necessary, and no more.

Bulge in float bowl wall caused by air filter stud over-tightening
Check that the float moves up and down freely without touching the walls. Check for a bulge in the float chamber wall, where the air filter stud sometimes pokes through.
7. Remove the fuel jet (8mm wrench or screwdriver) and clear it if necessary with an air stream. (fig 3). There are tiny drills, about drill number 75 and 74, that are the size perfect for cleaning out moped main jets. Any piece of wire thin and stiff enough will work, but only a size just smaller than the hole will clean it out completely, if it is coated with varnish. Even after soaking, it can still need “scraping”. A kinky wire can be a second best tool. A welder’s torch tip file is another way to clean tiny holes. So is a dentist’s root canal file.
 8. Look into the hole for the small slot in the center and a large different slot in the outer collar. If you don’t see this then it might be a press-fit diffuser type carburetor, instead of the usual slide-fit type. If this is covered in white (zinc oxide), then use vinegar on it first to remove enough white to see where the screwdriver slot is.
9. (Slide fit diffuser types) Apply a drop of oil to the lowest threads. With a 6mm wide (small but not tiny) screwdriver, unscrew the collar that holds the diffuser. Rattle or tap the carburetor to get it to fall out the bottom.
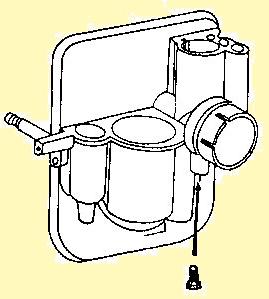
Fig 5 Idle hole plug
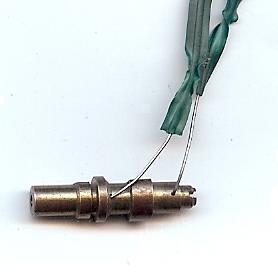
Cleaning MB diffuser idle holes with 0.012 inch thick ordinary twist ties
10. (Slide fit diffuser types) Push the diffuser from the top end downward. It might drop out. If the diffuser cannot be easily removed, lightly tap on the top end with a small hammer and punch. Clear the diffuser with a high pressure air line. Use an ordinary bread wrap twist tie, to “poke out” the two idle holes in the diffuser. Use a bigger wire (paper clip?) to scrape the center hole. Carefully (wear goggles) use carb spray to both check and clean the holes.
Note: Some carburetors are not equipped with a diffuser holder (collar). These carburetors do not have a removable diffuser. Do not try to remove the diffuser from this type of carburetor. Simply leave it installed and clear it with an air stream. See below “Press Fit Diffuser Type”.
11. Clean the fuel filter, the filter bowl, and the carburetor float bowl (fig 4). Clean the bottom guide hole by twisting a small drill bit with your fingers, to lift out the rust powder at the bottom. If this hole is dirty the float will not go down far enough, and the engine will starve at times.
12. Unscrew the plug screw (small phillips head screwdriver) and if necessary, clean it with an air stream (fig 5). This screw gives you access to the idle circuit. Here carb spray can again, carefully (wear goggles) be used to both clean and check the idle holes and tunnels. Locate all of the holes entries and exits. Verify that spray can get through everywhere.
This last operation can be done without removing the carburetor. Turn off the gas valve, lay the bike over on it’s side, and access the idle circuit cleaning plug from the bottom. Give it a shot of carb spray, replace the plug, stand the bike up, and start the flooded engine full throttle, carefully with the rear wheel held safely above the ground by a good centerstand. After it runs fast for a minute and it gets un-flooded, hope that it idles after that.
13. Reinstall the plug screw.

1. horizontal fuel tunnel 2. side holes in main jet 3. main jet restriction
4. diffuser inlet 5. vertical channel 6. chamber around lower idle hole
7. lower flat side is a fuel channel 8. chamber around upper idle hole
9. horizontal idle tunnel under slide 10. threaded plug hole for cleaning
11. idle spray hole to venturi 12. middle spray hole 13. main spray hole
14. upper flat side for aligning or locating diffuser 15. upper idle hole
16. lower flat side lets lower idle merge with upper 17. lower idle hole
18. screwdriver slot for lining up during installation 19. diffuser inlet
Assembling the Carburetor:
1. Fit the diffuser making sure the diffuser flattened side coincides with the flat side in the carburetor hole. The slot in the diffuser lower end is for rotating it gently during installation until the flat sides line up and it snaps up into it’s “home” position, where the shoulder is just below the floor of the venturi.
2. Locate the diffuser fully home.
3. Fit the diffuser holder (6mm slot head screwdriver) and the jet (8mm wrench).
Understanding where all the holes are, where they go, and what they do, and what happens when each one gets blocked or partially blocked, is half the battle. The other half is the actual cleaning and restoring.
True restoration is more difficult, but more rewarding than “replacement restoration”. It’s like fishing versus buying fish in the market.
Testing for Fuel Flow:
The carburetor is assembled and installed, fuel line connected, but with the jet removed. When the fuel petcock is turned on, in a few seconds fuel should begin dripping rapidly from the bottom jet hole. There should be a small continuous stream of fuel, not just rapid drips. The amount of fuel flow, for any size float-type carburetor, is enough to fill the volume of the float bowl in a few seconds. For a moped carburetor, this is about two or three teaspoons in five seconds, roughly. This tests the entire fuel system for flow. If there is low flow, then further tests are needed to isolate where it is blocked at.
Note that this is not the fuel flow to the engine. This is testing fuel flow to the reservoir or float bowl/chamber. When fuel flow to the engine, through the jet and diffuser, is blocked, the engine will not ever run right. When the jet gets partially blocked, applying the choke or blocking off some air with your hand will help compensate. When fuel flow to the reservoir is blocked, the engine will run perfect, for awhile, until the reservoir gets low. Then it will run dry and die out. Then after waiting for the float chamber to refill, the engine will restart and run fine again, for awhile, again and again.
Additional Information:
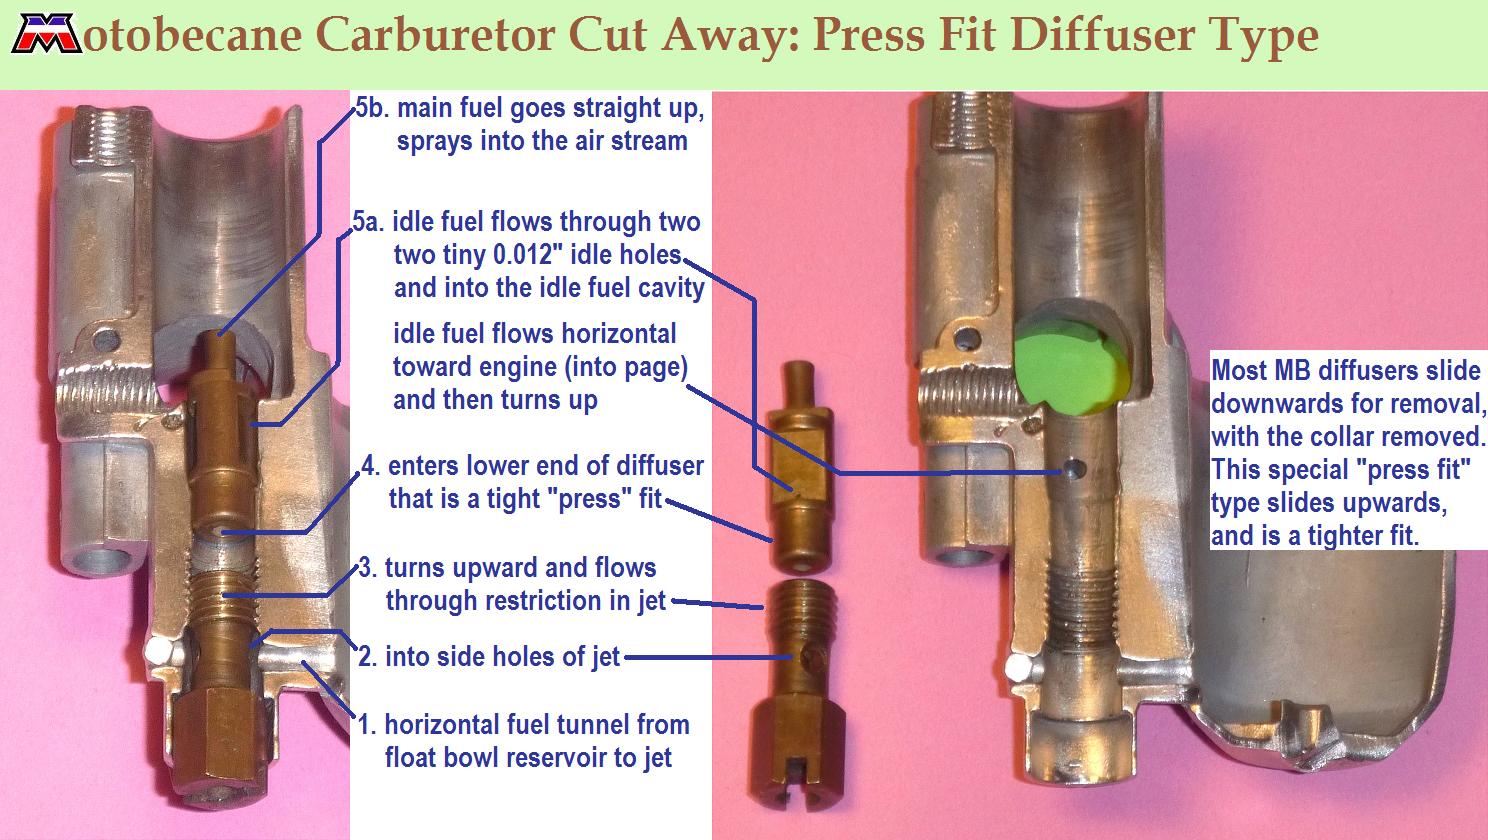
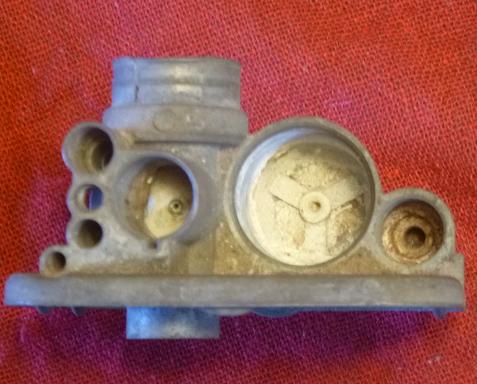
Slide Fit and Press Fit Diffusers: Some Motobecane carburetors have “press fit” diffusers, instead of the usual “slide fit”. This is one of those types (AR2-10-737 or AR2-10-991 or perhaps others) that has been sliced in half to expose it’s secrets.
While “slide fit” diffusers slide in and out from the bottom, this “press fit” diffuser 52560, and carburetor type, slides (presses actually) in or out from the top. Many of these get smashed on top by Motobecane mechanics trying to push the diffuser downwards, the normal way out.
Press-fit-diffuser carburetors cannot be made to accept slide fit diffusers.
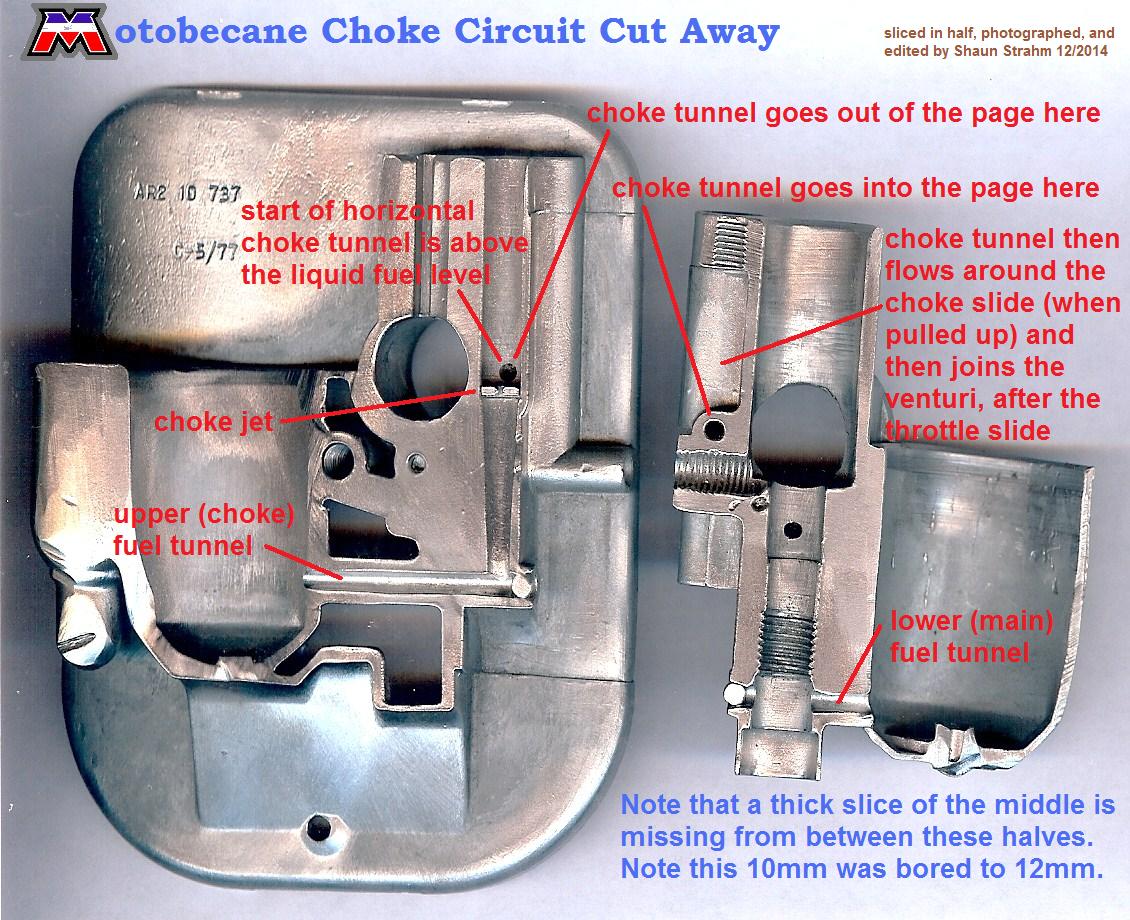
Choke (cold starting) system: Unlike the Peugeot Gurtner and most other moped carburetor chokes, the Motobecane Gurtner AR2 has an additional fuel path or tunnel. It’s “choke” is a fuel enrichment device rather than an air restricting device. The choke circuit is completely independent of the main fuel circuit. It has it’s own fuel tunnel out of the float bowl, that bypasses the throttle slide, diffuser, and jet.
Original Equipment Carbs have Dates: This carburetor clearly shows it’s manufacture date of 5/77, below the model number. It could be from a late 1977 or a 1978 bike. The 39 used Gurtner AR2 carburetors in Myrons Mopeds inventory on Dec 2014 have dates ranging from 03/74 to 04/80. The majority are from 1977 and 1979. See above “Population Study of Gurtner AR1 and AR2 Carburetors in Southern California”.
Choke Slide: This is often mysteriously missing, but actually stuck in the lowest (normal) position, either by tar or corrosion. It can be unfroze with solvent and/or by removing the cable wire and pushing it up from the bottom by tapping with a small punch and hammer. When the choke slide is pulled up, the choke is “on” for cold starting, and an extra fuel path is exposed by the step in the choke slide. If the choke slide is actually missing, the choke would be “on” all the time, but some extra air gets in along with the extra fuel. So the net effect of running without a choke slide is minor.

Gurtner AR2 bottom pull choke parts exposed
Gurtner AR2 top pull choke cable routing
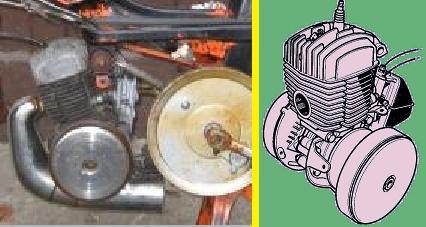
MB 30mph variator center-mount carb w/short pipe
Top Pull or Bottom Pull Choke Cable:
1. On center mount carburetors, for variator models, the choke cable is “top pull”. The choke and throttle cables detach, allowing the carburetor to be serviced away from the bike.

Motobecane 40TS has side carb top pull choke
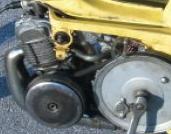
Motobecane 20mph no-variator side-mount carb with thin long pipe