Occasionally new mopeds, 2008 and later, leak transmission oil (ATF) at the front chain sprocket. The chain then slings the oil onto the rear of the bike. Here’s why.


With the distance bush removed you can see the thin o-ring #31 (033007). The white surface around it is the inner race of the big ball bearing #22. Click to enlarge images.
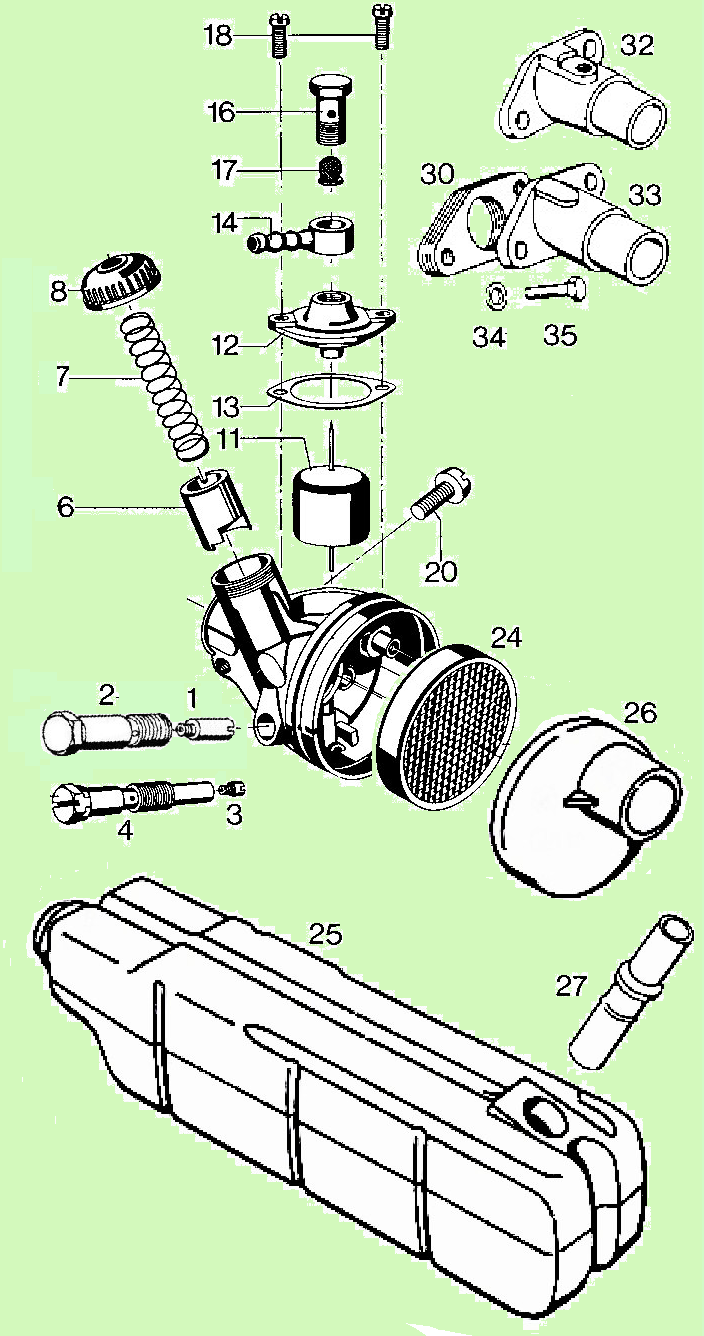
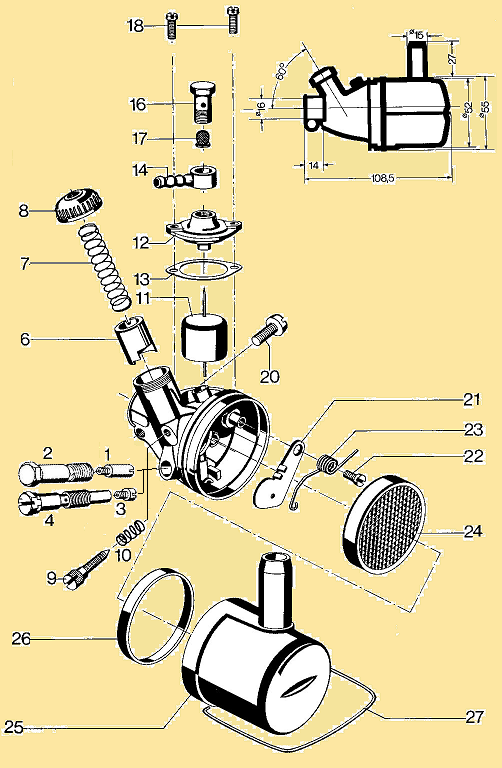
Sealing the coaxial drive is tricky. Oil can leak from three concentric circles.
- 1. the circle between the central pedal shaft and the drive shaft #23
- 2. the circle between the drive shaft #23 and the distance bush #20
- 3. the circle between the distance bush #20 and the outer big seal #21.
1. Leaks from inside the drive shaft
Pressed deep into the center of the coaxial driveshaft #23 (223453) is needle bearing #24 (033502). It’s left end has a thin rubber seal. This generally does not leak except in some high mileage machines, or if it is damaged during installation of the pedal shaft by a sharp corner at the end of the pedal shaft, such as caused by crashing or abuse. Tomos intentionally rounds the left end of the kick starter/pedal shaft, so it can’t cut the seal as goes in. When this “inner” seal leaks, the whole engine must be completely disassembled, to replace the driveshaft #23 (223453 for pedal, 223456 for kick), complete, at a cost of about $150 parts and $250 labor. Total $400. This is Option 1A, the way Tomos says in the 1985 A3 Service Manual, “In case of damage to the needle bearings in the main shaft, we suggest it’s replacement with a new complete main shaft.”
Alternatively, the motor can remain installed and assembled, except for the transmission gears and shafts, which are removed from the right side. Then it is possible to remove the leaking left needle bearing from the drive shaft on the right side. A very special custom modified inner jaw slide hammer type bearing puller tool is necessary. Then the cost, in most small shops, is about $220 for making the tool, plus $150 labor, plus $30 parts. Total $400. This is Option 1B, for skilled toolmakers. It is not in any Tomos service manual. But Tomos does sell the parts to do it.


Left, Tomos says in the 1992 A35 Service Manual, in case of damage to the inner main (drive) shaft seal or needle bearings, to remove them using a suitable tool, and install new ones with press tool 732.367.
Right, the installer 732.367 with a 16mm to 20mm step. The extractor 706.485 and extractor bridge 706.472 are for extracting the 12mm ID left counter shaft bearing, and the 12mm wheel bearings. Apparently, Tomos does not say how to extract the 8mm and 10mm ID transmission cover bearings, and the 16mm ID drive shaft needle bearings, in any of their manuals.
Much skill and craftsmanship is required to select, make or reshape the tool. Otherwise it tears up the delicate needle bearing, leaving the thin shell stuck in the bottom of a deep hole. That mess takes hours to clean up. The bearings are painstakingly peeled off in small pieces, like peeling a stubborn steel orange that’s down in a tight hole. You can barely reach it and see it. But you save $100.

Left, a Tomos drive shaft 223453 showing the two needle bearings installed. The kick driveshaft 223456 is identical except it is smooth and flat where the ring of ramps is. This particular one has broken all of it’s ramps off. The deepest bearing 033502 has a rubber seal at the left (deepest) end. Above it is 033503, another needle bearing, not as wide and without any rubber seal.

Right, the puller in action. Below right, the bearings are out, but still on the puller.

 Left, the two jaws must fit the 2o.5mm OD yet pass through the 16mm ID. Wider jaw lips and more jaws would be better.

 Left, the left sides of needle bearings 033502 and 033503. Right, the right sides.
033502 says “SNL SCE109RS” and 033503 says “SNL SCE108”. You can see the damage the puller did. You can see the black rubber seal on 033502, near the puller damage. When oil leaks from the center of the hollow coaxial drive shaft, rather than from under the surrounding distance tube 209077, it is from this seal, deep deep inside.

Right, the empty drive shaft with it’s bearings out, plus a thick rubber o-ring #30 (033006). The o-ring is an upgrade that comes on the newest bikes, 2012 and 2013. It is a heavy duty back up to the little seal in the left needle bearing. Left to right, the o-ring goes in the hole first, then the bearing 033502, seal side down, then the bearing 033503. These things are super easy to put in, just press straight in, with precise hammer taps. But they are super difficult to get out, even for professional mechanics.
These two ways of fixing the inner leak, Option 1A and 1B, are very difficult and/or very costly. They are the options that use Tomos original parts.
 A better way is with a special sprocket nut, custom made. MM made and sold these from 2003 to 2010, but no more.
At left, the upgrade nut, uses a 32mm wrench, precision machined to accept an off-the-shelf 16 x 24 x 6 metric oil seal. At right, an original Tomos front sprocket nut, M22 x 1.0, uses a 30mm wrench. This is only for when the back side of the sprocket is bone dry, and the pedal shaft is dripping wet where it exits the drive shaft, which means the leak is from circle 1, inside the drive shaft only.
2. Leaks from outside of the drive shaft
Before 2008: metal to metal in three places
2A. The back side of #20 distance bush 209277 against the front side of the #22 bearing.
2B. The front side of #20 distance bush 209277 against the back side of sprocket #17.
2C. The front side of sprocket #17 against the nut #19 and washer #18.
After 2007: o-ring upgrade, no more metal to metal
2. The beveled surface of distance bush 209077, against o-ring 033007, against #22 bearing.
Before 2008, a scratch on any one of those metal surfaces would cause a leak. But that almost never happened. The parts were always made precise and smooth. What’s funny is that the oil seal #21 rarely or never leaks. Until ’07, only a loose sprocket nut caused a leak. The sprocket and distance bush were almays made flat and never leaked. In 2007 we started seeing wavey sprockets. Dished sprockets on Revival, Streetmate, Arrow had their washer tab hole too far in towards the center. Myrons used to weld part of that and grind flat. Flat 26T sprockets 209078 were made warped by the stamping. Also in 2008 many distance bushs had deep gouges in them.

Tomos upgraded the 209077 distance bush by wedging an o-ring in the corner of driveshaft #23, bearing #22, and the back side of #20, and cut a bevel (about 30 degree angle) cut on the inside back corner of #20, to compress the O-ring as the sprocket nut is tightened. Then the wavey sprockets didn’t matter, since the O-ring stops the oil from reaching the sprocket in the first place. Even though they had the right idea, there were several problems with the 2008-2009 O-ring-sealed distance bushes 209277. Some were installed beveled side out instead of in. Some were made without enough bevel, also cutting the O-ring #033007. The dark colored distance bushes, made in India, in the current (2009) parts inventory are made right. Their bevel is 2.6mm wide. At least some of the ones coming on the 2009-later bikes are made with only a 2.0mm wide bevel, which somtimes pinches the o-ring during installation.
At left is an actual distance bush. It’s made of tool steel. It’s from the current (Aug 2012) Tomos USA inventory. It’s well made and correct. OD=34.75 ID=30.40 H=10.92mm


Right, 3 distance bushes, L to R, cut too much – won’t squeeze o-ring, cut just right, cut not enough – can pinch o-ring.
Even with a new o-ring and distance bush, oil still can leak here. Once the o-ring is seated and everything is clean, a liquid gasket such as Three Bond can be applied to the inside of the distance bush. Then the distance bush is put in place carefully, trying to squeeze but not pinch the o-ring. More liquid gasket can be applied to the back of the sprocket. Then the sprocket is put in place. Some more liquid gasket can be applied to the center splines and and front side of the sprocket. Then the tab washer and 22×1 nut is installed and tightened, with liquid gasket on the threads. That tends to be the final answer.
3. Leaks from outside of the distance bush
3. The inner lip of #21 (036620) oil seal, against the rotating outer surface of #20 distance bush 209277. This almost never leaks. The big seal, 036630, size 35 x 47 x 7mm, that you can see, seems to be the obvious guess. That guess is, 9 times out of 10, wrong. Replacing the big outer seal usually does not stop the oil leak (unless the seal was attacked by a screwdriver).
Horizontal Cross Section View of Driveshaft Assembly
Colors: Pink = Transmission Fluid Green = aluminum case Note: the upgrade o-ring #30 is not shown


 There has been confusion throughout the state of California ever since 1996 about the moped laws. Most people think you don’t need a license, if it’s under 50cc and has pedals. The confusion comes from the dual definition of motorized bicycle, which came out in 1996. In the 1970’s when mopeds came to the USA, you did not need a license. Ever since about 1981 you have needed a drivers license on a moped. Since 1989 it’s been a motorcycle class license. From 1996 to 2014, 20 mph 1000 watt electric bicycles don’t need a license. Since 2000, motorized scooter laws came out. In 2014, electric bicycle speed and power limits became 28 mph and 750 watt. California has more motorbike and oddball vehicle laws than most states.